
Por Rui Pina para o Pplware Tutorial realizado no âmbito do Mestrado em Computação Móvel do Instituto Politécnico da Guarda na Unidade Curricular de Seminário
Amarino toolkit possibilita a comunicação via Bluetooth entre um smartphone com o Sistema Operativo Android e um microcontrolador Arduino, permitindo controlar dispositivos ligados a este. O Amarino software toolkit assenta basicamente em dois componentes: Numa aplicação Android que é executada no smartphone e em um “sketch” (programa no Arduino), escrito com as bibliotecas Amarino
No post anterior a comunicação era feita Android –> Arduino, neste post vamos mostar o contrário Arduino –> Android.
Os procedimentos de configuração são iguais aos apresentados no post anterior (ver aqui), a única diferença reside nas funções que utilizamos para enviar do Arduino e receber a informação no smartphone da Android.
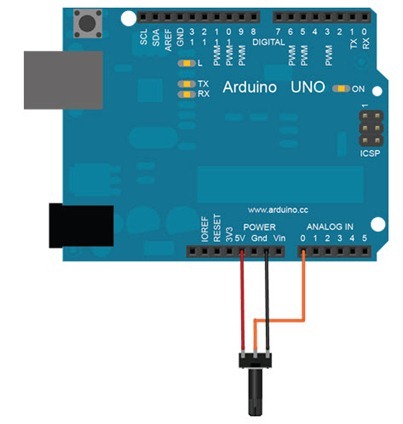
Vamos colocar no Android os valores de um potenciómetro ligado ao Arduino. O Shield XBee é colocado por cima, junto com o módulo Bluetooth.

Material necessário:
- Smartphone Android
- Microcontrolador Arduino
- Modulo Bluetooth para o Arduino
- Amarino Software Toolkit
- LED
- Cabo USB
- Potenciómetro
No Android
package rp.sensordata.com;
import rp.ruipina.com.R;
import android.app.Activity;
import android.content.BroadcastReceiver;
import android.content.Context;
import android.content.Intent;
import android.content.IntentFilter;
import android.os.Bundle;
import android.widget.TextView;
import at.abraxas.amarino.Amarino;
import at.abraxas.amarino.AmarinoIntent;
public class SensorDataActivity extends Activity {
	// change this to your Bluetooth device address
	private static final String DEVICE_ADDRESS = "00:03:19:0D:1D:B5";
	TextView tvTextoArduino;
	private ArduinoReceiver arduinoReceiver = new ArduinoReceiver();
	/** Called when the activity is first created. */
	@Override
	public void onCreate(Bundle savedInstanceState) {
		super.onCreate(savedInstanceState);
		setContentView(R.layout.main);

		tvTextoArduino = (TextView) findViewById(R.id.tvTextoArduino);
	}
	@Override
	protected void onStart() {
		super.onStart();
		// in order to receive broadcasted intents we need to register our
		// receiver
		registerReceiver(arduinoReceiver, new IntentFilter(AmarinoIntent.ACTION_RECEIVED));
		// this is how you tell Amarino to connect to a specific BT device from
		// within your own code
		Amarino.connect(this, DEVICE_ADDRESS);
	}
	@Override
	protected void onStop() {
		super.onStop();
		// if you connect in onStart() you must not forget to disconnect when
		// your app is closed
		Amarino.disconnect(this, DEVICE_ADDRESS);
		// do never forget to unregister a registered receiver
		unregisterReceiver(arduinoReceiver);
	}
	/**
	 * ArduinoReceiver is responsible for catching broadcasted Amarino events.
	 *
	 * It extracts data from the intent and updates the graph accordingly.
	 */
	public class ArduinoReceiver extends BroadcastReceiver {
		@Override
		public void onReceive(Context context, Intent intent) {
			String data = null;

			// the device address from which the data was sent, we don't need it here but to demonstrate how you retrieve it
			final String address = intent.getStringExtra(AmarinoIntent.EXTRA_DEVICE_ADDRESS);

			// the type of data which is added to the intent
			final int dataType = intent.getIntExtra(AmarinoIntent.EXTRA_DATA_TYPE, -1);

			// we only expect String data though, but it is better to check if really string was sent
			// later Amarino will support differnt data types, so far data comes always as string and
			// you have to parse the data to the type you have sent from Arduino, like it is shown below
			if (dataType == AmarinoIntent.STRING_EXTRA){
				data = intent.getStringExtra(AmarinoIntent.EXTRA_DATA);

				if (data != null){
					try {
						tvTextoArduino.setText(data);
					}
					catch (NumberFormatException e) { /* oh data was not an integer */ }
				}
			}
		}
	}
}
No Arduino
/*
  Sends sensor data to Arduino
 (needs SensorGraph and Amarino app installed and running on Android)
 */
#include
MeetAndroid meetAndroid;
int led = 13;
int sensorValue = A0;
void setup()
{
	// use the baud rate your bluetooth module is configured to
	initProgram();
}
void loop()
{
  	meetAndroid.receive(); // you need to keep this in your loop() to receive events
  	// read input pin and send result to Android
	meetAndroid.send(analogRead(sensorValue));
	// add a little delay otherwise the phone is pretty busy
	delay(100);
}
void initProgram()
{
	Serial.begin(115200);
	delay(2000);
	Serial.print("AT+JRES\n\r");                                    // Reset command
	delay(2000);
	Serial.print("AT+JSEC=1,1,1,04,1111\n\r");                      // Enable security command
	delay(2000);
	Serial.print("AT+JDIS=3\n\r");                                  // Discorable command
	delay(2000);
	Serial.print("AT+JRLS=1101,11,Serial Port,01,000000\n\r");     // Register local sevice command
	delay(2000);
	Serial.print("AT+JAAC=1\n\r");                                 // Auto accept connection requests command
	delay(2000);
	Serial.print("AT+JPCR=04,0000\r\n");                          // PIN code reply
	delay(2000);
	//connect the phone
	pinMode(led, OUTPUT);

	for (int i = 0; i < 100; i++) {
		// turn the pin on:
		digitalWrite(led, HIGH);
		delay(1000);
		// turn the pin off:
		digitalWrite(led, LOW);
		delay(1000);
	}
 //wait for connection
	Serial.print("AT+JSCR\r\n");

	pinMode(led, OUTPUT);
	digitalWrite(led,LOW);
}
Se tudo correu bem…no Android vamos ver os valores do potenciómetro.

Esperamos que tenham gostado deste tema e estamos abertos a sugestões para próximos artigos.